

The single best crepe streamer project for immediate visual impact is a layered backdrop, and it costs less than $15 and takes about 30 minutes to build. If you only try one thing from this list, make it that: a wall of overlapping crepe paper streamers in two or three colors, hung from a curtain rod with removable Command hooks, turns a blank wall into a photo-ready backdrop faster than almost any other party project. Ceiling canopies and table skirts come close behind it in payoff; however, they take more time and more rolls.
Here’s what you need for that fastest project, and where it comes from:
- 5 to 8 rolls of crepe paper streamers in two or three coordinating colors
- A dowel, curtain rod, or tension rod roughly as wide as your backdrop area
- removable wall hooks (Command strips or similar) so you don’t damage paint
- scissors and zip ties to secure the rod and trim the streamer ends
A layered crepe streamer backdrop built with 5 to 8 rolls, a dowel, and removable hooks runs about $10 to $15 in materials and takes roughly 30 minutes to assemble from start to finish.
That’s the whole pitch. Everything below breaks it into more ideas, more detail, and a full walkthrough so you can adapt it to whatever you’re throwing.
Table of Contents
- Crepe Streamer Ideas by Party Zone
- How to Build a Layered Crepe Streamer Backdrop
- Ceiling Canopies, Starbursts, and Streamer Chandeliers
- Table Runners, Buffet Skirts, and Outdoor Fence Garlands
- Crepe Streamer Crafts Kids Actually Want to Make
- Choosing Crepe Paper vs Plastic Streamers
- What to Buy and How Much You Need
- Fixing Sagging, Tearing, and Storage Problems
- Budget, Timeline, and a Setup Checklist
- Shop the Supplies for Every Project in This Guide
- Sources
Crepe Streamer Ideas by Party Zone
Not every streamer project belongs in the same spot. Some work as focal-point backdrops, some fill empty ceiling space, and some just dress up a table you’d otherwise cover with a plain cloth. Here’s a working menu grouped by where you’ll actually use them.
Photo backdrop and focal-wall ideas
- Layered straight-cut backdrop — hang full-length streamers from a rod, trim the bottoms even with the floor. Materials: 5 rolls, rod, hooks. Time: 20 minutes.
- Arc-trimmed backdrop — same setup, but trim the streamer ends in a gentle curve instead of a straight line for a softer photo frame.
- Fringe-cut wall panel — fold crepe paper accordion-style and snip fringe cuts before hanging for a textured, almost feathered look; this method works for backdrops under $25 using six large rolls.
- Ombré color wall — order streamers light-to-dark in one color family and hang them in graduated bands for a gradient effect.
- Masking-tape quick backdrop — skip the rod entirely and tape streamer tops directly to the wall using painter’s tape, a method that gets you a usable $5 to $10 backdrop in under 15 minutes.
- Metallic-accent backdrop — loop curling ribbon randomly through your hung streamers so it springs into spirals that catch light between the paper strands.
Ceiling and overhead ideas
- Starburst ceiling — anchor streamers to a central point (a hula hoop or light fixture cover works) and fan them outward to the walls.
- Swagged ceiling loops — attach streamers at intervals across the ceiling, letting each section dip in a loose curve rather than pulling them taut.
- Streamer chandelier — wrap an embroidery hoop or wire frame with streamers so it hangs like a soft, fringed light fixture over a dessert table.
- Doorway curtain — hang short streamer lengths across a doorway as a walk-through entrance effect.
Table and buffet ideas
- Twisted table runner — braid two or three colors of streamer together down the center of a table.
- Fringe table skirt — layer fringe-cut crepe paper around a table’s edge to hide folding-table legs.
- Napkin ring accents — tie a short streamer length around rolled napkins for a coordinated table setting.
- Buffet edge drape — pin streamers along the front edge of a buffet table so they hang like a mini valance.
Outdoor and yard ideas
- Fence or rail garland — weave streamers through a fence or porch rail (plastic streamers hold up better here than crepe in windy or damp conditions).
- Tree wrap — spiral-wrap a tree trunk or porch post with streamers for a quick outdoor color pop.
- Balloon arch accent — tuck streamer strands into a balloon arch for movement between the balloons; pair with items from a balloon decoration guide for a fuller display.
Party props and quick wins
- Table centerpiece topper — bundle streamer ends into a loose pom and set it in a vase.
- Chair back bows — tie streamer strands around chair backs for the head table.
- Dessert table backdrop mini-version — a scaled-down version of the main backdrop, sized to sit behind a cake table instead of a full photo wall.
How to Build a Layered Crepe Streamer Backdrop
This is the flagship project, the one worth walking through step by step. It uses items sold as party streamers and banners, scales to almost any wall size, and doesn’t require any special tools.
Materials list
- 5 to 8 rolls of crepe paper streamers (2 to 3 colors)
- 1 dowel, tension rod, or curtain rod matching your backdrop width
- removable wall hooks, 2 to 4 depending on rod length
- Zip ties or string to secure the rod to the hooks
- scissors
- optional metallic curling ribbon for accent
Step-by-step assembly
- Measure your wall space and pick a rod that spans it, leaving a few inches of overhang on each side.
- Attach removable hooks to the wall at the height and width you want the backdrop to start, following the hook packaging’s cure time before hanging weight on them.
- Rest the rod on the hooks, or secure it with zip ties if the hooks have a loop attachment.
- Cut streamers to roughly 1.5 to 2 times the finished drop length, then fold each one over the rod and let both ends hang.
- Repeat across the full rod width, alternating colors for a layered effect, packing the strands close together for fullness.
- Trim the bottom ends either straight across or in a shallow arc, depending on the look you want.
- Loop a few strands of metallic curling ribbon through the hung streamers at random intervals for shine and movement.
- Fluff the layers by hand, separating clumped strands so the backdrop has visible depth instead of lying flat.
Time and budget: About 30 minutes and $10 to $15 for a 5-foot-wide backdrop using 5 rolls of streamers, a rod, and hooks you likely already own.
Pro Tip: Order one extra roll per color beyond what you think you need. Crepe paper clings to itself and tears easily if you stretch it too thin trying to stretch coverage, and running out mid-project means an awkward gap right in the middle of your photo wall.
Ceiling Canopies, Starbursts, and Streamer Chandeliers
A backdrop gives you one wall. A ceiling treatment changes the whole room, and it’s often the piece people notice last but remember most. Three techniques cover most ceiling situations.
Starburst canopy. Pick a central anchor point, ideally something sturdy like a ceiling hook rated for light weight, not a light fixture itself. Attach one end of each streamer to that point, then fan the other ends out to hooks placed around the room’s perimeter. The effect reads like a paper sunburst radiating across the ceiling.
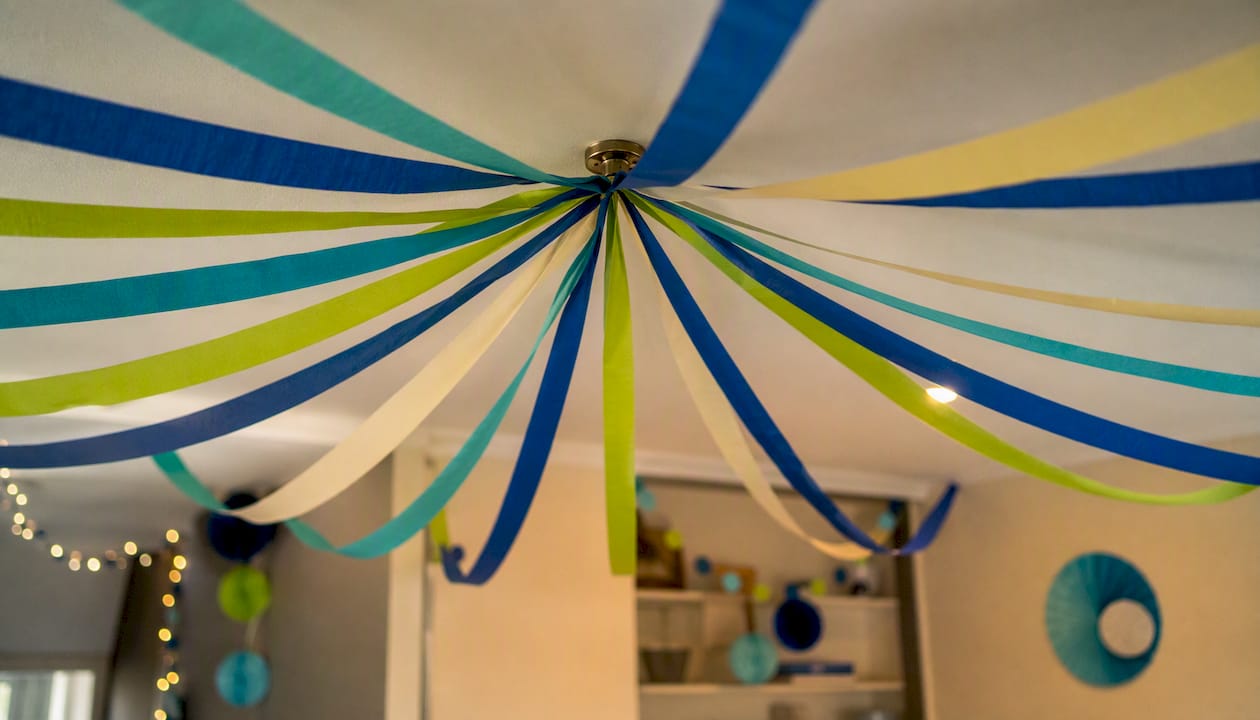
Swagged loops. Instead of one central point, set hooks at even intervals across the ceiling and loop a streamer section between each pair, letting it dip naturally rather than pulling it tight. This is the technique that photographs best in wide event shots because the curves catch shadow and light differently than flat lines.
Streamer chandelier. Wrap an embroidery hoop, wire wreath frame, or even a hula hoop with layered streamers so it hangs like a soft fixture. Suspend it from a single ceiling hook over a dessert table or dance floor for a focal point that doesn’t require covering the whole ceiling.
Safety matters more overhead than anywhere else in the room. Follow these rules for every ceiling install:
- Use removable ceiling hooks rated for the weight of paper and hardware, never nails or thumbtacks in a rental space.
- Keep all streamer material at least a foot away from any light fixture, especially incandescent bulbs that generate heat.
- Check local venue rules before attaching anything to sprinkler heads or smoke detectors; most venues prohibit it outright.
- Space starburst points every 12 to 18 inches around the room’s perimeter for even coverage without overcrowding.
Table Runners, Buffet Skirts, and Outdoor Fence Garlands
Tables and outdoor boundaries need a different approach than backdrops and ceilings because you’re often working around food, wind, or foot traffic.
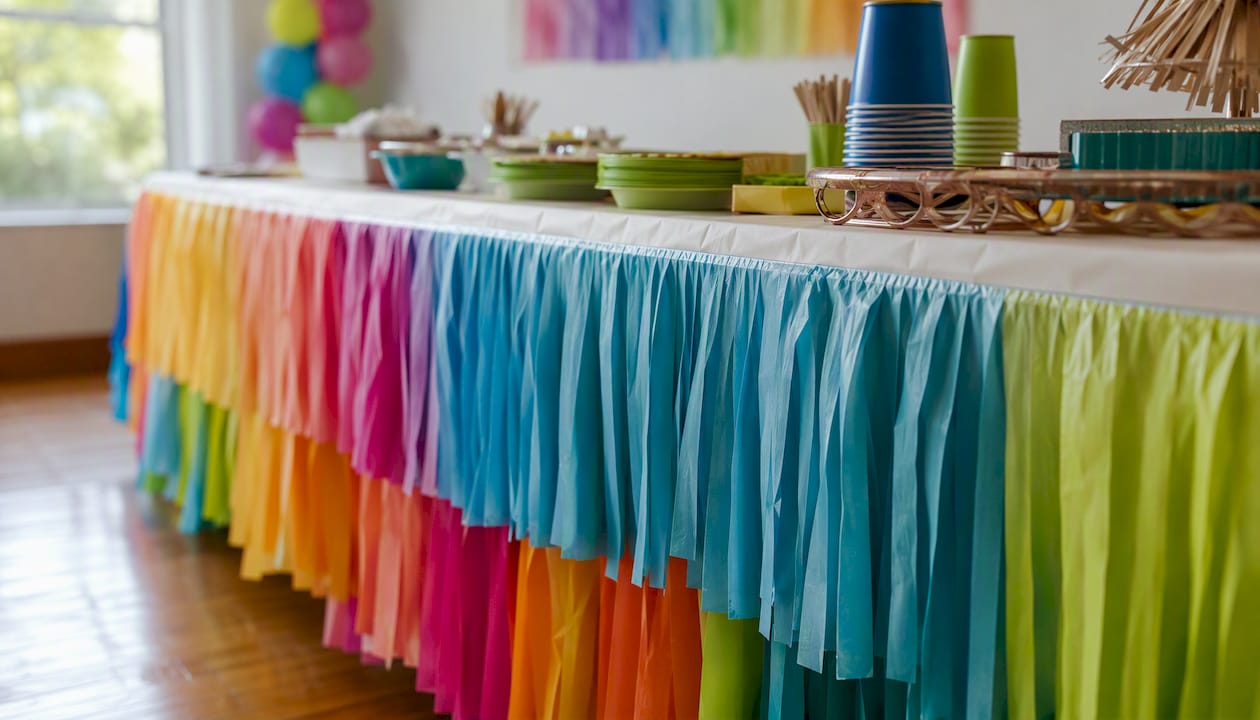
For table runners, a simple twist or loose braid of two colors down the center works better than a flat single strand. It holds its shape without tape and photographs well against tableware. For a buffet skirt, fold and cut crepe paper into fringe strips, then pin or tape the strips along the table’s front edge in overlapping rows so the attachment points stay hidden behind the layer above.
Outdoor fence and rail garlands come with one hard rule: material choice matters more than technique. Crepe paper handles indoor settings beautifully but plastic streamers hold up better outdoors because they resist moisture and wind without disintegrating, and you can reuse them for the next event. If you’re set on the crepe paper look outside, plan for a same-day install and a dry forecast, not a decoration that sits up overnight.
Attachment options worth knowing:
- Painter’s tape or wall-safe tape for indoor tables and walls, since it won’t pull paint or finish when removed.
- Zip ties or twine for fence rails and porch posts, which hold securely in wind better than tape ever will.
- Small clips or clothespins for buffet skirts, letting you adjust or remove sections quickly during setup.
- Removable hooks for anything attached to a wall or door frame that needs to come down cleanly afterward.
Crepe Streamer Crafts Kids Actually Want to Make
Leftover streamer rolls from a backdrop project don’t have to sit in a drawer. They’re some of the cheapest craft material available, and dozens of streamer-based projects exist specifically because the material is so easy for kids to handle. Here are six that work as party activities or take-home favors.
- Streamer wands. Tie 6 to 8 short streamer strands to the end of a wooden skewer or dowel with a glue dot. Kids wave them during dance parties or as parade props.
- Tissue-style flowers. Layer several streamer strands, fold accordion-style, tie the center with a pipe cleaner, and fan out both sides into petals.
- Tassel garlands. Cut streamers into short lengths, gather a bundle, and knot them around a length of twine to build a simple tassel string.
- Wrapped number or letter props. Wrap streamers around a cardboard number or letter cutout, securing with washable glue dots for a textured party sign.
- Pom-pom balls. Bundle several long streamer strands, fold them in half repeatedly, and tie the center tightly before fluffing out both ends into a sphere.
- Paper leis. Loop and tie short streamer sections along a length of string for a quick necklace favor.
Keep scissors age-appropriate and supervise younger kids around small glue dots, which pose a choking risk if left within reach of toddlers. Washable glue sticks or dots are worth the small extra cost over stronger adhesives, since streamer crafts often end up on hands, tables, and occasionally faces before the party’s over.
Choosing Crepe Paper vs Plastic Streamers
The material you pick determines how the whole project holds up, and this is the one decision worth slowing down for before you buy anything.
Crepe paper gives you that soft, slightly crinkled texture that reads as handmade and refined, which is exactly why it works so well for indoor backdrops, baby showers, and photo walls. Plastic streamers trade that texture for weather resistance, holding up against wind and light rain in ways crepe paper simply can’t, and you can pack them away and reuse them the following year.
| Dimension | Crepe Paper Streamers | Plastic Streamers |
|---|---|---|
| Best for | Indoor backdrops, photo walls, table decor, kids’ crafts | Outdoor fences, patios, rentals exposed to weather |
| Cost | Low, typically a few dollars per roll | Slightly higher per roll, but reusable across events |
| Durability | Single-use, tears if stretched or wet | Reusable, holds up in wind and light moisture |
| Time to build | Fast to hang and shape, easy to fringe or twist | Fast to hang, less flexible for fringe or twist effects |
| Visual effect | Soft, textured, ruffled or fringed finish | Glossy, smooth finish with less texture depth |
Pro Tip: If you’re decorating a covered patio or a garage that opens to the yard, split the difference: use crepe paper for the indoor-facing backdrop and switch to plastic streamers for anything within a few feet of the open air.
What to Buy and How Much You Need
Once you know which project you’re building, the shopping list gets simple. Here’s what covers a small backdrop project versus a full-room canopy.
For a small photo backdrop (5 feet wide):
- 5 to 8 rolls of crepe paper streamers in 2 to 3 colors
- 1 dowel or curtain rod
- 2 to 4 removable wall hooks
- scissors and zip ties
For a medium room canopy or ceiling treatment:
- 12 to 20 rolls of streamers, depending on ceiling size and how dense you want the coverage
- 6 to 10 ceiling hooks placed at even intervals
- Extra rolls held in reserve, since ceiling projects burn through material faster than backdrops
A standard streamer roll runs about 4.5 centimeters wide and 22 meters long, though exact dimensions vary by brand, so check the packaging if you’re calculating exact coverage for a large wall or ceiling.
Dollar Tree is a commonly cited source for basic single-color streamer rolls if you’re stretching a tight budget, and it works fine for kids’ crafts or a first test run of a technique. For anything going in photos, though, a slightly heavier or wider crepe paper roll holds its shape and color better under flash photography, which is where a dedicated party supplier earns its keep over a bargain-bin pack.
Fixing Sagging, Tearing, and Storage Problems
Most streamer problems have quick fixes, and knowing them ahead of time saves you from a mid-party scramble.
- Sagging or drooping strands: retape the top attachment point, since tape loses grip faster than the paper itself fails.
- Torn or ripped streamers: twist the torn section into a small knot to hide the tear, or trim it short and let a fresh strand take its place.
- Static cling between strands: hand-fluff the layers to separate them; this is a normal quirk of crepe paper, not a sign anything’s wrong.
- Fading in direct sunlight: move the backdrop out of direct light exposure when not in use, since crepe paper’s dye fades faster under sun and humidity than most other decor materials.
- Paint damage after removal: always use painter’s or wall-safe tape instead of packing tape, which can pull paint or wallpaper when peeled.
For storage, roll unused streamers loosely rather than folding them, and keep them in a cool, dry spot away from direct sun. Crepe paper holds up fine for a second use if it wasn’t exposed to rain or heavy humidity the first time around.
Pro Tip: Test any tape on a small hidden section of your wall or rental venue’s paint before committing to the full backdrop. Some finishes react badly even to painter’s tape, and finding that out on the visible section of your wall is a bad surprise.
Budget, Timeline, and a Setup Checklist
Here’s what three common project scales actually cost and how long they take, based on the materials and methods covered above.
| Project Scale | Materials Needed | Estimated Cost | Estimated Time |
|---|---|---|---|
| Mini (table accent or centerpiece) | 1 to 2 rolls, ribbon, glue dots | $3 to $6 | 10 to 15 minutes |
| Medium (ceiling swag or fence garland) | 8 to 12 rolls, hooks, zip ties | $15 to $25 | 30 minutes |
| Photo backdrop | 5 to 8 rolls, rod, removable hooks | $10 to $15 | About 30 minutes |
Setup-day checklist:
- Measure your wall, ceiling, or table space before buying anything.
- Buy one extra roll per color beyond your estimate.
- Test your tape or hooks on a small hidden section first.
- Hang the rod or set hooks before touching a single streamer.
- Loop and layer streamers, working section by section.
- Trim ends and fluff layers for volume once everything’s hung.
If you’re ordering supplies online rather than grabbing them from a local store, build in a few extra days of lead time before the event, and always round your roll count up rather than down.
Three rules that make streamer decor look professionally done
Most streamer setups that look amateur share the same problem: not enough material and lines pulled too tight. Three adjustments fix almost every case I’ve seen discussed across party-planning circles.
First, over-order. Buying one extra roll per color costs a couple of dollars and removes the single most common failure point, which is running short halfway through hanging a wall.
Second, stop trying to make every line perfectly straight and even. A slight organic sag or twist in a streamer line reads as more intentional and more professional than a taut, ruler-straight strand, which tends to look stretched and thin instead of full.
Third, layer your colors instead of running one color at a time in blocks. Alternating two or three colors as you hang, rather than finishing one color before starting the next, creates depth that a single-color wall can’t match, even with more rolls.
If you take nothing else from this, take the backdrop tutorial and try it once. It’s the cheapest, fastest way to see whether crepe paper is a decor material worth building your whole event around.
Shop the Supplies for Every Project in This Guide
Every project above uses the same short list of items: streamer rolls, a rod, removable hooks, and a little ribbon for accent. Usnovelty stocks the streamer side of that list directly, which means you’re not hunting across three different stores to gather materials for one backdrop.
A basic backdrop kit runs light: pick up party streamers in two or three colors, add a pennant banner or foil accent piece to layer above the streamer wall, and toss in a pack of foil balloons on sticks for a table centerpiece that matches. A cart built around those three items typically lands well under $30, before hooks or a rod you likely already have at home. If you’re storing leftovers for a second event, large cello bags keep rolls dust-free between uses.
Browse the full streamer and party supply catalog at Usnovelty and build your cart around whichever project from this guide you’re tackling first.
Top starter project, best material, and one finishing tip
The layered crepe streamer backdrop remains the best entry point into streamer decor because it delivers the most visible payoff for the least time and money invested.
| Point | Details |
|---|---|
| Best starter project | Build the layered backdrop first; it takes about 30 minutes and costs $10 to $15 with 5 to 8 rolls. |
| Recommended material for indoor use | Choose crepe paper for backdrops, ceilings, and tables; switch to plastic streamers for anything outdoors. |
| Finishing pro tip | Hand-fluff hung streamers and loop in curling ribbon for shine instead of leaving strands flat. |
| Buy extra, not exact | Order one extra roll per color to avoid running short mid-installation. |
| Where to shop the kit | Usnovelty carries streamer rolls, banners, and balloon accents to build the full backdrop kit in one order. |
Sources
- DIY Crepe Paper Streamer Backdrop in 30 Minutes (Under $15!)
- Creative Streamer Decoration Ideas for Any Celebration - Atdecor
- How to Decorate With Paper Streamers - Decoratick
- Amazon
- Transform Crepe Paper Streamers into 60+ Stunning Crafts