

Setting up a candy buffet comes down to three things: the right containers, 5–7 candy varieties, and enough quantity for your guest count. Plan 2–3 ounces of candy per guest for a display-only buffet, or bump that to 4–6 ounces per guest when you’re sending guests home with take-home favor bags. Use a free tool like the Candy Buffet Calculator at UseCalcPro to convert those numbers into actual pounds and container counts before you shop.
Your three non-negotiables before anything else:
- A table size that fits your container count (at minimum 6 feet for 50+ guests)
- 5–7 candy varieties covering at least three textures (chocolate, gummy, hard/wrapped)
- Scoops or tongs per container, labels, and favor bags at the take-home station
Usnovelty stocks every product category on that list, from apothecary-style jar sets to coordinated favor bags and signage.
Key Takeaways
A well-executed candy buffet starts with containers, not candy: plan your jars and zones first, then calculate candy weight to fill them.
| Point | Details |
|---|---|
| Quantity rule | Plan 2–3 oz per guest for display only; 4–6 oz per guest when adding take-home bags. |
| Table zones | Use three rows: tall jars at back, scoopable jars in middle, wrapped candy and favor bags at front. |
| Candy variety | Stock 5–7 varieties across chocolate, gummy, hard, novelty, and salty categories. |
| Hygiene basics | One scoop or tong per jar; napkins at both ends; a trash bin within 3 feet of the table. |
| Usnovelty supplies | Shop jar sets, favor bags, scoops, and centerpieces at Usnovelty for a coordinated, one-stop cart. |
Table of Contents
- How to set up a candy buffet: what to buy first
- How to arrange your table for maximum visual impact
- How much candy do you actually need?
- Step-by-step setup order on event day
- Serving hygiene and keeping the buffet clean
- Pro tips and the mistakes hosts make most often
- Your printable candy buffet checklist
- Accommodating dietary restrictions beyond the label
- What to do with containers and leftover candy
- A quick note on setup order and transport (recap)
- What I’ve learned from watching hosts set these up
- Everything you need is already at Usnovelty
- Sources
How to set up a candy buffet: what to buy first
Before you touch a single jar, build your shopping list by product category. The container-first planning method works better than starting with candy weight because it anchors your visual plan to what guests will actually see.
Containers and serving vessels
Choose apothecary-style jars with wide openings. A jar that’s too narrow or too deep makes scooping awkward and causes spills. Per HWTM’s step-by-step guide, test your actual scoop inside the jar before you pack for the event. Shallow, wide-mouth jars work best for bulk gummies and chocolates. Tall cylinder jars suit lollipops and wrapped candies that stand upright.
Shopping list by category:
- Containers: 2–3 tall statement jars (back row), 3–4 medium scoopable jars (middle row), 2–3 shallow trays or bowls (front row)
- Scoops and tongs: one per container; mini tongs for small wrapped candies, larger scoops for bulk gummies or mints
- Favor bags and boxes: small party bags for take-home candy; one per guest minimum
- Labels and sign holders: tent cards or chalkboard signs for each candy variety plus allergen notes
- Table linens: a fitted tablecloth in your event color; coordinates with your candy palette
- Risers and props: cake stands, wooden crates, or stacked books under a cloth; aim for at least three height levels
Candy categories to cover
You need variety across flavor and texture, not just color. A well-built candy bar typically includes:
- Chocolate/wrapped: M&Ms, foil-wrapped truffles, or chocolate-covered almonds (bulk filler, roughly 40% of total weight)
- Chewy/gummy: gummy bears, sour worms, or fruit chews (about 30% of total weight)
- Hard/mints: ribbon candy, starlight mints, or rock candy sticks
- Novelty/visual anchors: Party On Lollipops or large swirl pops that stand tall in statement jars
- Salty reset: pretzels, yogurt-covered raisins, or popcorn to break sweetness fatigue
The OnePageParty calculator suggests allocating roughly 40% to bulk fillers, 20% to visual anchors, 30% to chewy/gummy, and 10% to a salty contrast item.
Pro Tip: Order candy 2–3 weeks before the event. Containers can ship simultaneously from Usnovelty so everything arrives together and you can test jar-and-scoop fit before the event day.
How to arrange your table for maximum visual impact
The three-zone layout is the single most reliable framework for a candy table that photographs well and functions smoothly for guests.
The three horizontal zones
Back zone (tallest): Place your statement jars here, filled with wrapped candy, lollipops, or rock candy sticks. These create the visual backdrop. Add a Sweet Stuff Centerpiece or a foil banner behind the table to anchor the whole display.
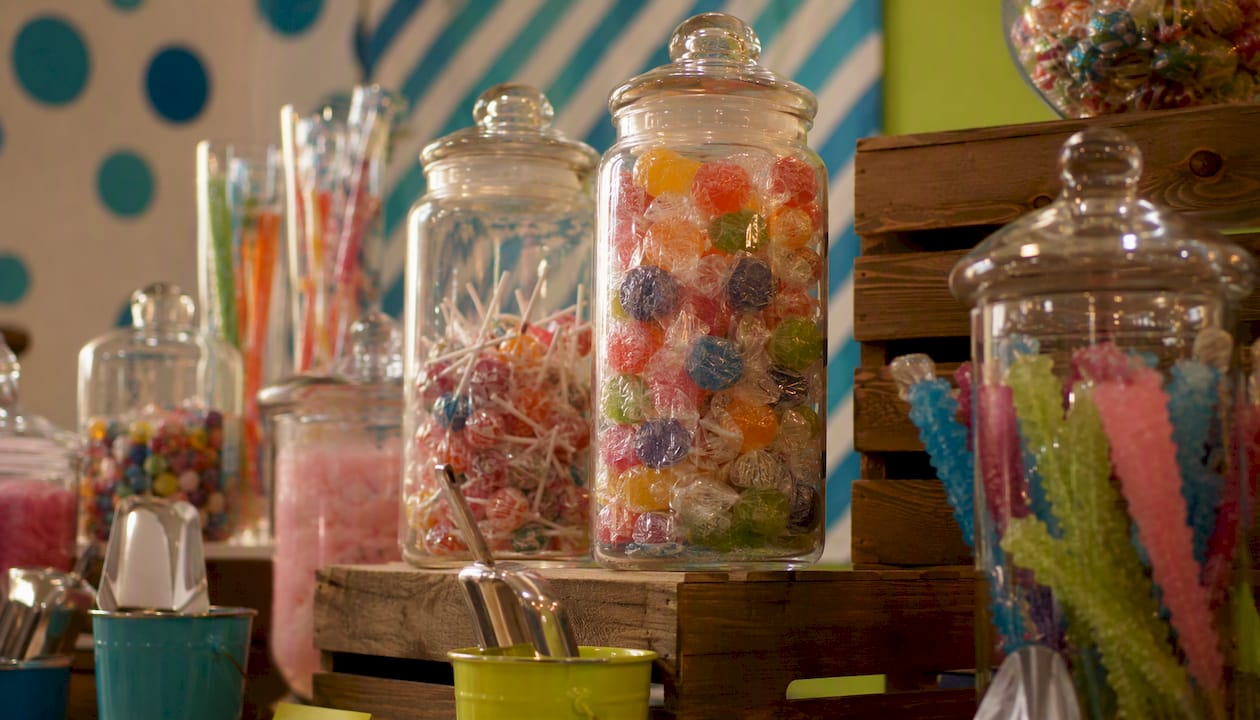
Middle zone (scoopable): Medium jars of bulk gummies, chocolates, and mints sit here. This is the workhorse row. Guests reach in with scoops, so keep openings wide and jars no more than two-thirds full.
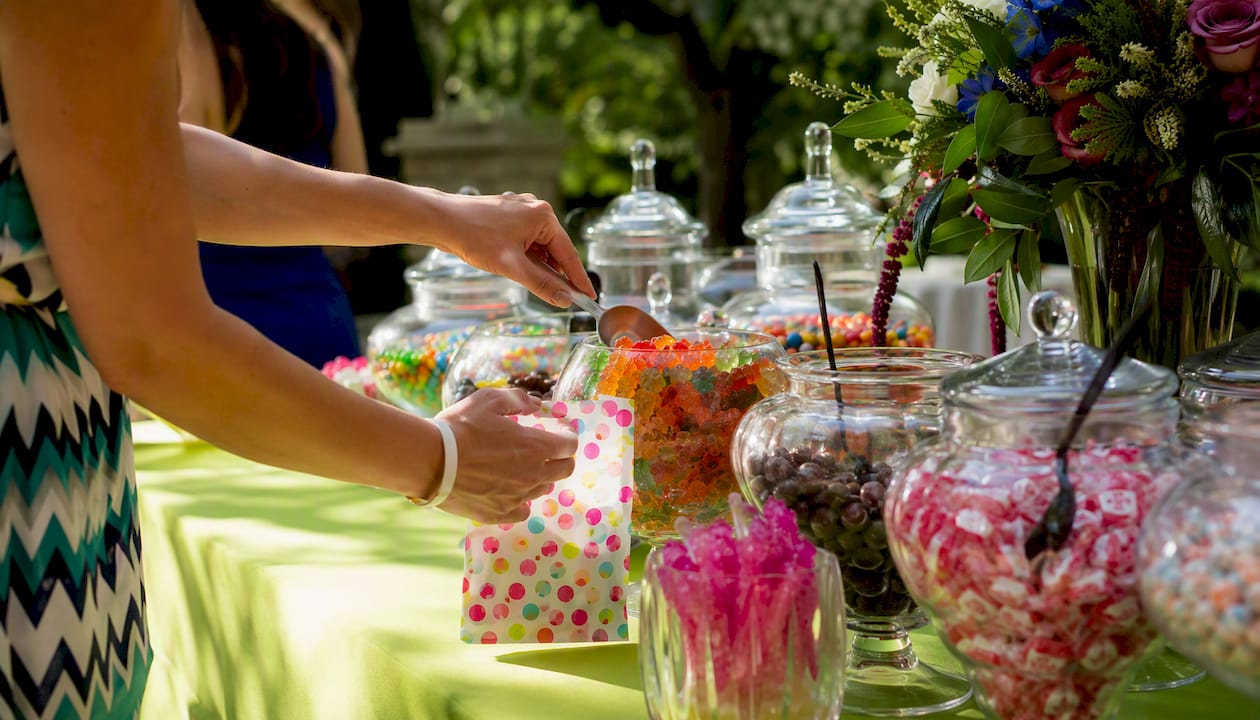
Front zone (low-mess): Shallow trays of individually wrapped candies, small chocolates, or novelty items. Guests grab these without tools, which keeps traffic moving. Your favor bag station lives at one end of this zone.
Per Soirée Event Design’s planning guide, smaller jars with risers create the impression of abundance far more effectively than simply buying more candy.
Height, color, and finishing touches
Use at least three height levels: risers under back-row jars, flat surface for middle jars, and a slight drop for front trays. Cake stands from Usnovelty’s birthday centerpieces collection work perfectly as risers and double as décor.
Color coordination matters more than most hosts expect. Pick two dominant colors and one accent, then match your tablecloth, favor bags, labels, and balloon accents to that palette. Usnovelty’s tableware options and purple party supplies roundup are good starting points for color-matched table accessories. Scatter Party Cakes Confetti across the tablecloth for texture without clutter.
Leave 12–18 inches of elbow room between jar clusters so guests aren’t bumping into each other. Position the table so the back is against a wall or backdrop, giving you a clean photo angle from the front.
Pro Tip: Before the event, step back 10 feet and photograph the table with your phone. If any jar looks half-empty or any zone looks flat, add a riser or swap in a smaller jar before guests arrive.
How much candy do you actually need?
The math is straightforward once you know your event role for the buffet.
| Guest Count | Buffet Only (2–3 oz/person) | With Take-Home Bags (4–6 oz/person) | Approx. Containers (6 varieties) |
|---|---|---|---|
| 20–50 guests | 3–5 lbs | 6–9 lbs | 6 jars |
| 50 guests | 6–9 lbs | 12–15 lbs | 6–8 jars |
| 80 guests | 10–15 lbs | 20–30 lbs | 8–10 jars |
| 150 guests | 15–35 lbs | 35+ lbs | 10–12 jars |
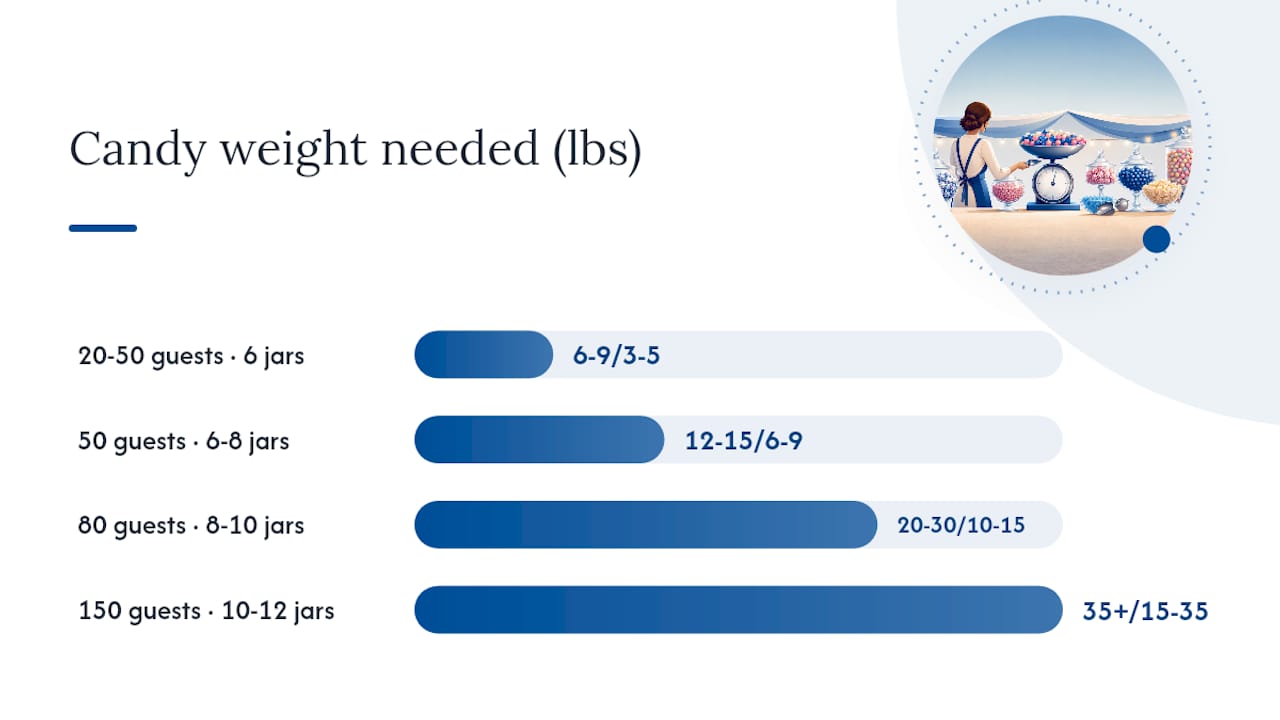
The calculator at Calculator.city uses the formula: total candy weight = guests × ounces per person, then divides by the number of varieties to get per-jar allocation. For 80 guests with 6 varieties and take-home bags, that’s roughly 15 lbs for display and 35 lbs total including bags, per the UseCalcPro example.
Budget ranges
Per-guest candy cost typically runs $1.50–$4.00 depending on candy grade. Bulk filler candies (wrapped mints, foil chocolates, gummies from wholesale bags) keep costs near the low end. Premium chocolates, specialty gummies, or imported sweets push toward the high end. Buying in bulk and using filler candy for visual volume are the two fastest ways to cut cost without shrinking the table.
Order containers and linens 3–4 weeks out. Order candy 2–3 weeks out. Shipping delays on glass jars are the most common last-minute problem hosts face.
Step-by-step setup order on event day
Numbered setup sequence
- Arrive at the venue and lay the tablecloth flat; smooth out wrinkles before anything goes on top.
- Place risers, crates, and cake stands in position before any jars go down.
- Set tall back-row jars (empty) in position and confirm spacing.
- Fill back-row jars on-site if transporting pre-filled risks spills; otherwise, fill them at home and transport upright in a crate with padding.
- Place and fill middle-row scoopable jars; add scoops or tongs to each.
- Set front-row trays and fill with wrapped or grab-and-go candies.
- Place labels and sign holders at each container.
- Set up the favor bag station at one end: stack bags, add a scoop, and place a small sign.
- Do a final visual check from 10 feet away and adjust any jars that look low or off-center.
- Stash refill bags under the table or in a nearby tote for mid-event top-ups.
Timing by event size
Small events (20–50 guests): Set up 1–1.5 hours before guests arrive. One person can handle it.
Medium events (50–150 guests): Allow 2–2.5 hours and bring a helper. Pre-fill jars at home the night before and transport in padded boxes.
Large events (150+ guests): Budget 3+ hours and assign one person specifically to monitor and refill the table during the event.
For transport, wrap glass jars individually in dish towels or bubble wrap and pack them upright in a sturdy box. Never stack jars. Bring extra candy in sealed bags stored under the table so you can refill without a trip to the car.
Usnovelty’s guide to organizing party supplies covers packing and transport logistics tied to specific product types, which is worth a read before your first big setup.
Serving hygiene and keeping the buffet clean
Keep one scoop or set of tongs per container, and never let guests use their hands in open jars. Single-use favor bags at the take-home station prevent double-dipping. Place napkins and a small trash bin within arm’s reach of the table so guests have somewhere to put wrappers.
Basic hygiene rules that actually matter:
- One dedicated scoop or tong per jar, attached with a ribbon or clip so it stays put
- Napkins at both ends of the table (not just one side)
- A small trash receptacle within 3 feet of the table
- For outdoor or warm-weather events, use only wrapped candy in the front zone; heat melts chocolate and gummies fast
Labeling and allergen signage
Label every container with the candy name and any major allergens (nuts, dairy, gluten, soy). Tent cards or small chalkboard signs work well. Usnovelty carries sign holders and label sets that coordinate with themed tableware. Place allergen labels in a contrasting color so they’re impossible to miss.
For guests with serious allergies, create a clearly separated zone at one end of the table with individually wrapped, allergen-free options. Mark it with a distinct sign (“Nut-Free Zone” or “Dairy-Free Options Here”). This is more effective than relying on guests to read fine print on a shared jar.
Pro tips and the mistakes hosts make most often
Common mistake #1: Buying too much candy by weight. Hosts often overbuy because a half-empty jar looks bad. The fix is smaller jars and risers, not more candy. Event planners at Soirée Event Design consistently recommend this approach: a small jar that’s full looks more abundant than a large jar that’s 60% full.
Common mistake #2: Choosing jars with impractical openings. A tall, narrow vase looks elegant but is nearly impossible to scoop from. HWTM’s planning guide specifically advises testing your scoop inside every jar before purchase. If the scoop can’t reach the bottom without tipping the jar, choose a different container.
Common mistake #3: Ignoring traffic flow. Guests cluster at the most accessible point of the table. Put your most popular candy (usually chocolate) in the middle zone, not at one end. Place the favor bag station at the far end so guests move along the whole table before bagging up.
Pro Tip: Test every jar-and-scoop combination at home before the event. Fill the jar to your planned level, insert the scoop, and simulate a guest reaching in. If it’s awkward, fix it now, not in front of 80 people.
A practical tip for visual volume: use wrapped candy or large gumballs as filler in the bottom third of tall jars, then layer your premium candy on top. Guests see a full jar; you spend less on the expensive stuff.
Your printable candy buffet checklist
Use this list to build your shopping cart and your packing box.
Shopping checklist
Containers:
- 2–3 tall statement jars (wide-mouth, 1–2 gallon)
- 3–4 medium scoopable jars (wide-mouth, 0.5–1 gallon)
- 2–3 shallow trays or bowls for front zone
Utensils:
- One scoop per scoopable jar
- Mini tongs for wrapped candy trays
- Ribbon or clips to attach utensils to jars
Candy (5–7 varieties):
- Bulk filler (chocolate, wrapped mints): ~40% of total weight
- Chewy/gummy: ~30% of total weight
- Hard candy or rock candy sticks: ~10% of total weight
- Novelty lollipops or visual anchors: ~10% of total weight
- Salty contrast item: ~10% of total weight
Favor packaging:
- Small party bags: one per guest plus 10% extra
- Twist ties or stickers to seal bags
Labels and signage:
- Tent cards or chalkboard signs: one per container
- Allergen labels in a contrasting color
Table accessories:
- Fitted tablecloth in event color
- Risers, cake stands, or crates (3 height levels minimum)
- Napkins at both ends of the table
- Small trash bin near the table
Packing checklist for transport
- Jars wrapped individually in dish towels or bubble wrap
- Refill bags of each candy variety in sealed zip bags
- Extra labels and a marker for on-site adjustments
- Tape, scissors, and ribbon for last-minute fixes
- A small tote stored under the table for mid-event refills
Order specialty items (custom labels, themed sign holders, novelty lollipops) at least 3 weeks out. Standard containers and favor bags from Usnovelty ship quickly, but glass jars benefit from a buffer. The SmallStuffCounts candy buffet checklist is a solid printable reference to cross-check against your own list.
Accommodating dietary restrictions beyond the label
Labeling is the floor, not the ceiling. Guests with celiac disease, tree nut allergies, or dairy restrictions need more than a small sign on a shared jar.
The most practical approach: designate a physically separate section of the table with its own containers, scoops, and signage for allergen-free options. Stock it with candies that are certified gluten-free, nut-free, or vegan, and use a different color scheme for that zone so it’s visually distinct from the main display.
For vegan guests, fruit-based gummies made without gelatin and hard candies are usually safe. For guests avoiding gluten, most hard candies and many wrapped chocolates qualify, but check labels carefully since shared manufacturing lines are common. For nut allergies, keep that zone entirely separate and use dedicated scoops that have never touched the main table.
Coordinate with the guest of honor or host in advance to confirm which restrictions apply. A quick note on the invitation or event page asking guests to flag dietary needs gives you time to source the right products rather than scrambling the week before.
What to do with containers and leftover candy
Glass apothecary jars are the most reusable item on your table. After the event, wash them and store them for the next party, use them as kitchen canisters, or donate them to a local school or community center for their own events.
Leftover candy in sealed, wrapped form keeps well for weeks. Portion it into small bags and send it home with guests who didn’t fill a favor bag, or donate sealed bags to a food bank or community pantry. Many food banks accept commercially wrapped candy, especially around holidays.
For favor bags and paper goods, look for recyclable options when shopping. Usnovelty’s favor bags are lightweight and low-waste. Avoid single-use plastic bags when paper or compostable alternatives are available.
Fabric tablecloths are worth the small extra cost over plastic because they’re reusable across multiple events. If you used a plastic tablecloth, check whether your local recycling program accepts clean plastic film before tossing it.
A quick note on setup order and transport (recap)
The sequence that consistently works: set the table structure first (cloth, risers, empty jars), then fill from back to front, then add labels and utensils last. This order prevents you from knocking over filled jars while placing risers.
For transport, pre-fill only jars with wrapped or hard candy that won’t shift or melt. Fill gummy and chocolate jars on-site. Pack glass in padded boxes, upright, never stacked. Bring a small toolkit under the table: extra labels, a marker, tape, and refill bags. Styling a display table follows the same back-to-front logic whether it’s drinks or candy, and the same transport principles apply.
If you’re setting up the day before, cover the filled table with a clean sheet or plastic wrap overnight to keep dust off open containers. Set up labels and favor bags the morning of the event so they look fresh.
What I’ve learned from watching hosts set these up
The hosts who pull off the best-looking candy tables aren’t the ones who spent the most. They’re the ones who committed to a container plan before they bought a single piece of candy. Every time I see a table that looks off, it’s usually one of two things: jars that are too large and half-empty, or a color palette that drifted because the host bought candy first and containers second.
The product-first approach fixes both problems. When you start with your jars and risers, you know exactly how much candy you need to fill them, and you know what colors you’re working with before you buy a single gummy bear. Usnovelty’s party supplies collections make this easier because you can shop containers, favor bags, and tableware in coordinated sets rather than hunting across multiple stores.
One more thing: the favor bag station is almost always an afterthought, and it shows. Give it its own dedicated space at the end of the table with a sign, a stack of bags, and a scoop. Guests love it, and it keeps the main jars from being raided for take-home candy.
Everything you need is already at Usnovelty
Usnovelty carries the full product lineup for a candy buffet: apothecary-style jar sets, scoops and tongs, small favor bags, themed tableware, centerpieces, and coordinated decorations. Orders over $75 ship free, so building a complete cart for a medium-sized event usually qualifies.
Start with the containers and favor bags, then add a Balloons Mini Cascade Centerpiece as your table focal point and beverage napkins for both ends of the table. Browse the full party supplies store at Usnovelty to build your cart, confirm your color palette, and place your order at least three weeks before the event.
Sources
These resources include free calculators, printable checklists, and design examples that help you refine quantities and layout before you shop.
- Candy Buffet Calculator — Quantities, Containers & Cost | UseCalcPro
- How Much Candy for a Wedding Candy Bar? Calculator + Budget Guide | OnePageParty
- Candy Buffet Calculator - Estimate Candy Quantity & Cost
- How to set up a candy buffet + how much does a candy buffet cost? — Soirée Event Design
- How To Set Up A Candy Buffet (Step By Step Instructions!) — HWTM
- Candy buffet ideas and checklist — SmallStuffCounts